Build your own Renaissance Lute!
Feedback and addenda
This was the page for people doing the renaissance lute course, but because so many of the questions that arise apply equally to both renaissance and baroque lute making I have decided to amalgamate the two help/feedback pages. This one is now not being added to and you should click here to see the new joint page. This new page has all the content from here as well so you can just bookmark the new page.
Hi David.
I have a rose-sized piece of spruce that I’m using to practice cutting the rose. After gluing the paper to the back, I noticed that it was warping. Not too surprising, since wetting the one side makes it expand on the wet side. I thought that it would flatten out as it dried, but it went the other way, and is now curved in the other direction, concave on the paper side. It’s bowed about 4mm. Is this going to be a problem when I cut the rose on the real soundboard? Hope this makes sense!
Regards, Dan
Dear Dan,
Yes, that’s quite a normal reaction but annoying. It’s hard to predict and allow for since it turns on how much the paper expands when soaked in glue, relative to the amount the wood expands. In your case the paper expanded more. You could try getting some different paper, I find watercolour 100% rag paper the best, get it from an art supply shop. Expensive but you don’t need much.
The glue itself shrinks considerably as it dries so the less glue you leave in the paper/wood joint the better, so do get a roller and use it to squeeze out as much as possible while gluing the paper on.
However all is not lost, even on your test piece. Make up about 10 or 12 “sticks”, square section rods of wood about 6mm x 6mm x 300mm and cover these with sellotape to prevent adhesion. Then place half of them equally spaced apart on the bench, damp both sides of your wood and paper assembly, place on top of the sticks then place the other sticks exactly over the first ones so the wood/paper is sandwiched between them. Them put a large piece of wood over the whole lot and press down with a heavy weight to hold the workpiece flat. Allow this to dry for about 24 hours and the curvature should have reduced or gone. You can repeat the procedure if necessary.
If you have the same problem with the real soundboard the same technique works well.
Let me know how you get on.
Best wishes,
David
Hi David
After many attempts to make ebony strips to put between the ribs I gave up on it - they kept cracking during the bending process and it was hard to get them really smooth. It was kind of disappointing and finally depressing, so I stopped for a while. I did learn that when you say 'sharpen your tools often' you REALLY mean to sharpen tools often, so maybe not all was lost, but still! Today i felt inspired to try something else. I changed to rosewood and changed the technique to make them, I made a simple drawbar - and finally : success! I just made my first bent strip, perfectly shaped without problem. Great! On to the next step.
yours,
Daan
Dear Daan,
Very sensible, ebony is much more brittle than rosewood which really bends quite nicely.
I think it might be an idea to alert people to using rosewood if like you they have problems with ebony. In fact some ebony is much more tractable than others and I reckon I can now tell which is which by looking at it carefully. There is a sort of gritty quality to the surface of the brittle stuff whereas the good bending stuff looks smoother. There may even be a sub-species involved.
For the moment I'll put this exchange up on the help-pages
Best wishes,
David
I have had a couple of enquiries about methods for taking glue joints apart if something has gone wrong or for alterations of any sort. This made me realise that I had not covered this aspect of lutemaking properly in the course.
I give the general principles first, followed by specific methods for regluing soundboard bar ends.
Briefly the need is to get moisture into the joint followed by heat. The moisture takes a long time to migrate through wood so the best way is to put wet tissue along the joint edges and to seal this from evaporation by applying cling-film over everything. Then you need to leave it for a long time, overnight for thin joints and two or three days for large joints, re-applying water as necessary. After the glue has been rehydrated you can start to apply heat, iron and damp cloth will easily release thin joints. Something major like a neck joint will probably need a thin table knife repeatedly dipped in hot water and worked in slowly. You can also apply steam to the knife as you work but this needs tubing and a source of steam, I have adapted an old Teasmade kettle! Difficult and takes time but can be done. Don’t skimp on the time re-hydrating though.
Dear David
My problem is that, having glued on the soundboard last winter, I noticed yesterday that on the treble side about half way down, there's a bit of give when I press down on the soundboard. It also makes a slight cracking noise and I suspect that one or more of the bars in that area has come unglued. If this is the case, do I just accept it, or is this likely to cause structural problems when the strings are on? Is it even possible to remove the soundboard for re-gluing, or perhaps just a the affected portion? I know this is standard practice with violins, but as the glue used for lutes is stronger, as I understand it, this makes for complications in lute restoration.
Thanks for your help
Regards
Sacha
Dear Sacha,
Sorry to hear of your problem but yes it is serious and you shouldn’t ignore it.
On the plus side it isn’t too much of a job to rectify. You're right it sounds exactly like the ends of one or more bars are loose.
You don’t need to take the whole soundboard off [though that is entirely possible] Put a damp rag over a portion of the soundboard edge near the problem and leave it for a couple of hours to get some moisture into the glue there. [unlike violins which routinely have their soundboards removed dry] Then warm the edge with a warm iron over the damp rag enough to soften the glue so that you can get the end of a table knife into the joint at a point between the bars. Use the knife and some hot water to open the joint between the bars, put a tiny wedge in to hold it open and then work outwards to open it over the bar ends. It is very useful to make up a thin stainless steel artist’s palette knife with a rightangle bend at the extreme tip. Heat it to red hot with a blowlamp and bend it with pliers or in a vice. You can insert this in the joint and use it to pull the rib away from the bar ends.
Work along until you have freed enough joint to allow the soundboard to be pulled up away from the rib to reveal the ends of the loose bars. The procedure MAY loosen more bar ends but that only means they were at risk anyway. But obviously try not to loosen more than you can help.
Then modify the little clips from lesson 17 by shaving the thin leg down until it will fit into the gap and allow you to clamp the bar end to the soundboard using a wedge.
When all is ready, just work some good strong glue into each bar end joint and clamp shut one by one. Make sure you work the glue right in by opening and closing the joint and applying hot glue, the movement will draw the glue in by capillary action.
Leave overnight, clean up carefully with warm water, allow to dry and then re-glue the soundboard in the normal way.
Do each side in turn if both are affected.
Good luck, it's not the worst mistake that could happen. Let me know how you get on. I'll put this on the help page in case others have the same problem in the future.
Best wishes,
David
New string sizes for nylon/carbon option on the renaissance lute
Several of the "carbon" string sizes have recently been discontinued and so this set of sizes has been revised to take account of the changes. This means that the tensions are not precisely the same as for gut and Nylgut; in practice the differences are negligible.
|
For A=440 Hz: |
||
|
g' d' a f c G F D |
NR 5042 PVF 5045 PVF 5059 PVF 5072 VN 5108 VN 5136 VN 5050 VN 5180 |
PVF 5045 PVF 5059 PVF 5072 (oct. NR 5044) VN 5108 (oct. PVF 5048) octave PVF 5059 octave PVF 5063 octave PVF 5076 |
|
For A=415 Hz: |
||
|
g' d' a f c G F D |
NR 5044 PVF 5048 PVF 5063 PVF 5076 VN 5112 VN 5140 VN 5160 VN 5190 |
PVF 5048 PVF 5063 PVF 5076 (oct. PVF 5039) VN 5112 (oct. PVF 5048) octave PVF 5063 octave PVF 5068 octave PVF 5079 |
For these strings email
Bernd Kürschner
Obere Waldstraße 20
D-65232 Taunusstein
Germany
Tel: + 49 (0)6128 6910
Fax: + 49 (0)6128 8207
Email: kuerschner@kuerschner-saiten.de
Website: http://www.kuerschner-saiten.de/
Dear David,
Hi David , Dear Eric,
Just some days ago I told you that I have just finished my lute and today as
I was tuning it the bridge has suddenly come off.
Now the question is very simple, what do I have to do?
is it necessary to unglue the soundboard?
Thank you for you help
It does happen even to the best makers, so you mustn't feel too bad about it. If you have used hot glue, it is fairly straightforward to re-glue.
Clean the bottom of the bridge and the soundboard thoroughly with hot water and an old toothbrush. Leave both to dry. Check that the bottom surface of the bridge is perfectly flat from back to front. If not, put a plane, set VERY fine and VERY sharp, upside down in the vice and plane the bottom of the bridge by pulling it firmly over the plane. Hold onto the little ears very firmly as they pass over the plane blade. or they will be torn off. A slight curve over the length of the bridge is not too important if you can bend it flat with hand pressure.
Make up a secure "nest" for your lute with cloth padding arranged so that it sits front up securely and so that you can press fairly firmly without causing it to roll about.
Then mix up some good strong glue, perhaps slightly thicker than you used last time, but not much, it must still flow out like varnish. Coat the bridge very generously and the soundboard, put the bridge in place and rub it from side to side until all the glue has squeezed out. Lift it off and put lots more glue onto the bridge. Rub it down into place firmly and then hold it there by hand pressing firmly for at least five minutes and better ten. This will be very boring, have some music on the radio!
And then leave it overnight before cleaning up with a gluebrush dipped in warm water..
It should be okay to string up the next day.
A question. My father has finished the mold and we are
getting serious about pondering wood for the back. We had
a strange idea that we thought we'd run past you.
First some background. I own an old ~1900 Embergher mandolin
with the most astonishing back. You've probably seen these
instruments... the vault is made of heavily flamed maple... and is
comprised of 30-40 tiny scalloped ribs. The interesting thing is that
the figure pattern in the maple is continuous across the back....
that is to say, it looks as if the ribs were cut (side-by-side) from
the same flat piece of wood, rather than being sliced off of a block
and each pair book-matched.
So... assuming that my conclusion is correct (which it may not be)...
we had the idea that we would order a thick sheet of some pretty
veneer and cut the lute ribs out of it side-by-side. I have found
places on the Web that advertise that they can cut veneers up to
3.2mm thick. Can you think of any reason that this approach would
be problematic... assuming we can find a thick veneer that is large
enough?
Thanks,
Eric
On the whole I wouldn't advise using veneer unless you can be absolutely certain that it is saw-cut veneer and not knife cut. The various slicing methods used to make veneer break a lot of the cross fibres and so make it very weak across the grain. Of course if it has been cut with a large circular saw then it is functionally the same as a normal lute rib, but I very much doubt that it will be saw-cut if the width is large enough to get all 11 ribs out side by side. Consider the size of the circular saw blade required and the consequent wastage of wood. Veneer production is all about buying premium wood and then minimising wastage.
However I strongly suspect that your mandolin has been made with normal wood sliced in consecutive slices from the block but then lined up as I suggest is possible in the second sketch in Lesson 7, IE lining up the grain features from one rib edge to the adjacent edge on the next rib.
Particularly if the figure is nearly at right-angles to the rib this will give the effect you describe of having been cut from one piece of wood. Someone earlier in the course raised the question of the difficulties of choosing wood from among the many square billets primarily intended for turners. These are often a very useful source of lute ribs in interesting timbers but the needs of turners are not the same as lute-makers and so I thought you might like to consider the options.
By the way I hope I've made it clear that normally the consecutive slices are NOT book-matched but simply used one after the other with the same side out. If you book-match alternate pairs you will get a herring-bone effect. This is possible and not unknown in lutes but personally I don't like it and it is much rarer in historic lutes. Maybe I don't like it because it was used a lot for the German lute-guitars of the 19th and 20th century Wandervogel movement!
Best wishes,
David
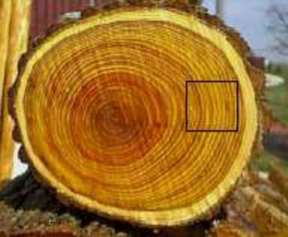
Often these come in pieces taken from near the centre of the tree or from a small tree, where the radius of the endgrain is quite small so that you can't get quartersawn or slab sawn slices right through the piece of wood.

If you look through the whole stock you may find some pieces from a larger tree or from further out, where the grain will be more of a piece.
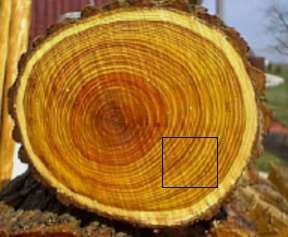
However there is no structural reason not to use this sort of wood. Lutes were made with rib wood in all directions of grain, it's not important at all, either structurally or tonally. The only question is appearance, if you take the slices in order across the lute back the changes will occur gradually and may well look fine. Lay them out on the bench to see. I know you're mostly worried about what to choose in the sawmill and really there isn't much guidance to offer except to say look at both sides of the block and compare the appearance and try to imagine a gradual change from one to the other and decide whether you can live with that.
The ideal though, is to have the grain running fairly straight through the block from one side to the other. This is known as quartersawn and gives the most consistency of appearance and the most stability in bending.
From this it follows that if you have the chance to buy a whole plank, you will get the most useful wood from the central plank that runs right through the centre of the tree.
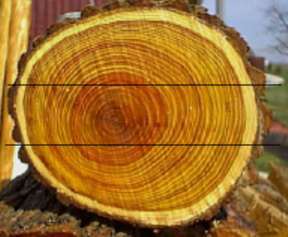
However this layout is actively avoided by most sawmills since these “boxed heart” planks, as they are known in the UK, are less useful for the furniture making trades who comprise the most influential customers. More often than not the sawmill will try to cut straight down the centre of the log and you will get planks either side of the centre thus:
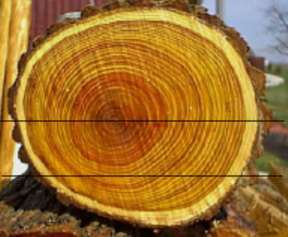
In these cases there is only a central section of the plank which can be fully quartersawn and it is anyway rather close to the heart of the tree and thus has rings of rather a small radius.
I hope this helps, it can be quite daunting when faced with a small mountain of wood to choose from.
It might be worth noting here that I have taken the initial picture of the log end from the Osage Orange site http://www.osageorange.com This is a timber unknown to me but it is used for longbows and thus looks as if it would make a good yew substitute for lute ribs especially in the USA where it is an indigenous species of tree. They did offer to send me a sample but I haven't seen it yet.
Copyright © David Van Edwards 2002 All Rights Reserved